
If, like me, you enjoy consistently journaling about your life, you’ve probably accumulated a ton of documents that you’d like to analyze with AI but might not feel comfortable sharing with external servers. I have good news for you: you can run LLMs entirely locally even without much compute!
Pre-requirements
You will need a terminal*, and either Python + pip or Docker (depending on your preferred installation method for OpenWebUI).
(*all systems (Windows, Mac, Linux) include one, you can find yours with a quick search)
Installation
- First you will need to install Ollama. 2. You will also need to install OpenWebUI if you want to interact with your local LLM through a browser UI (like you do with chatGPT).
I installed OpenWebUI through pip (the Python package installer) with pip install open-webui as indicated here, but you can also install it as a Docker program or through Python (check this page to get the commands to run on the terminal for MacOS/Linux or Windows)

3. You will need to pick an LLM model to install (or multiple). You can find the available models here.
💡 I recommend giving chatGPT or another AI your laptop model or PC specifications so it can suggest a model according to your hardware limitations (in my case I tried Gemma 3 4B and had to downgrade to 1B, because the query would never finish).
4. Once you’ve chosen a model, click on it on the Ollama list to get the command you need to run on the terminal.
(Note: indicate “gemma3:1b” or other to download the version with a specific parameter count)

5. Once you have installed Ollama and your desired model, confirm that they are active by running ollama ps in the terminal:

6. Run WebOpenUI to launch the browser interface with:
open-webui serve7. Then head over to http://localhost:8080/. Now you are ready to start using your LLM locally! 🎉

(Note: it will ask you for login credentials, but these don’t really matter if you only intend to use it locally)
Settings for documents
Now we are going to set up everything we need to interact with our local documents.
First of all, you should enable the “memory” feature if you want the LLM to remember the context of your past conversations in your future ones.
- Download the Adaptive memory function here. Functions are like plug-ins.

2. We are going to use the “nomic-embed-text” model to process our documents. Install it with:
ollama pull nomic-embed-text
3. Now we will choose our settings. Click on your name on the bottom-left corner, then “Settings”.

4. Click on the first one, then go to “Personalization” and enable “Memory”.

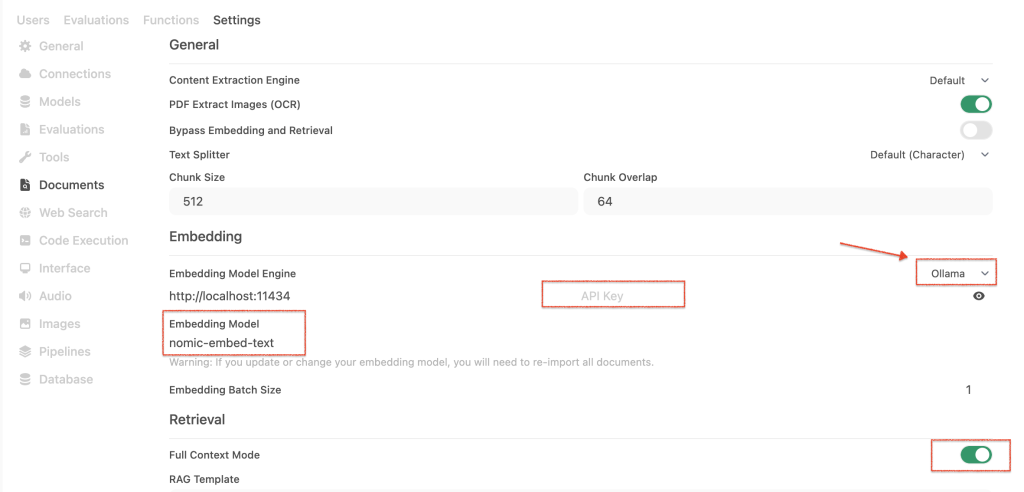
5. Now we are going to access the other settings panel. Click again on your name in the bottom-left corner and go to Admin panel → Settings → Documents

6. In this section (Admin Panel → Settings → Documents), find the “Embedding” section, go to “Embedding Model Engine” and choose Ollama (find the selectable to the right). Leave the API Key blank.
7. Now, under “Embedding Model” write nomic-embed-text.
8. Then go to Retrieval → enable Full Context Mode
9. I also set the chunk size to 512 and the overlap to 62 as recommended by chatGPT.
Uploading your documents
Now the final step: uploading your documents!
- Go to “Workspace” in the side panel, then “Knowledge”, and create a new collection (database). You can start uploading files here.

⚠️ Make sure to check for any errors during the upload. Unfortunately they only show as temporary pop-ups. Some errors might be due to the format of your files (check the console for further error logs).
2. Then in “Workspace”, switch to the “Models” tab and create a new custom model. This is so you can associate the documents database to your model so it knows to refer to it when you query it.

3. Here, make sure to select your model (in my case “gemma3:1b”) and attach your knowledge base


💡 Optionally, you can also add a system prompt that the model will use for context throughout all your conversations. Commonly, this is where people add a prompt like “You are an expert high-performance coach with…”, but you can also add context about yourself (“I am a 20-year-old student in bioengineering interested in…”), instructions on how you prefer it to talk (“no fluff”, “be direct”, etc), or more context about how your data is structured.
You can also add any prompts you expect to use frequently (“give me a summary of the past week”) under “User prompts”.
Running your local LLM
Now open a new chat and make sure to select your custom model:

Now you are ready to chat with your own docs in a private local environment! 🎉
Note: By default the frontend/browser will stop streaming the response after 5 min, even though it will keep processing your query in the background. This means that if your query takes more than 5 minutes to process, it will not show it on the browser. You can just reload the page and click “continue response” to get the latest output.
I recommend installing the Enhanced Context Tracker function (plugin) in these cases so you get more insights into the process.